April 09, 2019 posted by Maxime Villard

Six months ago, I told myself I would write a small hypervisor for an old x86
AMD CPU I had. Just to learn more about virtualization, and see how far I could
go alone on my spare time. Today, it turns out that I’ve gone as far as
implementing a full, fast and flexible virtualization stack for NetBSD. I’d like
to present here some aspects of it.
General Considerations
In order to achieve hardware-accelerated virtualization, two components need to
interact together:
-
A kernel driver that will switch machine’s CPU to a mode where it will be able
to safely execute guest instructions. - A userland emulator, which talks to the kernel driver to run virtual machines.
Simply said, the emulator asks the kernel driver to run virtual machines, and
the kernel driver will run them until a
VM exit occurs. When this
happens, the kernel driver returns to the emulator, telling it along the way
why the
VM exit occurred.
Such exits can be IO accesses for instance, that a virtual machine is not
allowed to perform, and that require the emulator to virtualize them.
The NVMM Design
NVMM provides the infrastructure needed for both the kernel driver and the userland
emulators.
The kernel NVMM driver comes as a kernel module that can be dynamically loaded
into the kernel. It is made of a generic machine-independent frontend, and of
several machine-dependent backends. In practice, it means that NVMM is not
specific to x86, and could support ARM 64bit for example. During initialization,
NVMM selects the appropriate backend for the system. The frontend handles
everything that is not CPU-specific: the virtual machines, the virtual CPUs, the
guest physical address spaces, and so forth. The frontend also has an
IOCTL interface, that a userland emulator can use to communicate with
the driver.
When it comes to the userland emulators, NVMM does not provide one. In other
words, it does not re-implement a Qemu, a VirtualBox, a Bhyve (FreeBSD) or a VMD
(OpenBSD). Rather, it provides a virtualization API via the libnvmm library, which
allows to effortlessly add NVMM support in already existing emulators. This API is
meant to be simple and straightforward, and is fully documented. It has some
similarities with WHPX on Windows and HVF on MacOS.
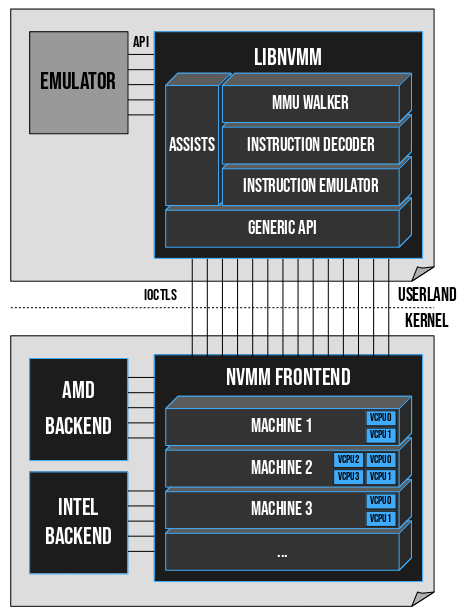
Fig. A: General overview of the NVMM design.
The virtualization API is installed by default on NetBSD. The idea is to provide
an easy way for applications to use NVMM to implement services, which can go
from small sandboxing systems to advanced system emulators.
Let’s put ourselves in the context of a simple C application we want to write,
to briefly showcase the virtualization API. Note that this API may change a
little in the future.
Creating Machines and VCPUs
In libnvmm, each machine is described by an opaque nvmm_machine structure.
We start with:
#include <nvmm.h>
...
	struct nvmm_machine mach;
	nvmm_machine_create(&mach);
	nvmm_vcpu_create(&mach, 0);
This creates a machine in ‘mach’, and then creates VCPU number zero (VCPU0)
in this machine. This VM is associated with our process, so if our application
gets killed or exits bluntly, NVMM will automatically destroy the VM.
Fetching and Setting the VCPU State
In order to operate our VM, we need to be able to fetch and set the state
of its VCPU0, that is, the content of VCPU0’s registers. Let’s say we want to
set the value ‘123’ in VCPU0’s RAX register. We can do this by adding four more
lines:
	struct nvmm_x64_state state;
	nvmm_vcpu_getstate(&mach, 0, &state, NVMM_X64_STATE_GPRS);
	state.gprs[NVMM_X64_GPR_RAX] = 123;
	nvmm_vcpu_setstate(&mach, 0, &state, NVMM_X64_STATE_GPRS);
Here, we fetch the GPR component of the VCPU0 state (GPR stands for General
Purpose Registers), we set RAX to ‘123’, and we put the state back into
VCPU0. We’re done.
Allocating Guest Memory
Now is time to give our VM some memory, let’s say one single page. (What follows
is a bit technical.)
The VM has its own MMU, which translates guest virtual addresses (GVA) to
guest physical addresses (GPA). A secondary MMU (which we won’t discuss)
is set up by the host to translate the GPAs to host physical addresses. To give
our single page of memory to our VM, we need to tell the host to create this
secondary MMU.
Then, we will want to read/write data in the guest memory, that is to say, read/write
data into our guest’s single GPA. To do that, in NVMM, we also need to tell the
host to associate the GPA we want to read/write with a host virtual address
(HVA) in our application. The big picture:

Fig. B: Memory relations between our application and our VM.
In Fig. B above, if the VM wants to read data at virtual address 0x4000, the CPU
will perform a GVA→GPA translation towards the GPA 0x3000. Our application
is able to see the content of this GPA, via its virtual address 0x2000. For
example, if our application wants to zero out the page, it can simply invoke:
memset((void *)0x2000, 0, PAGE_SIZE);
With this system, our application can modify guest memory, by reading/writing to
it as if it was its own memory. All of this sounds complex, but comes down to
only the following four lines of code:
	uintptr_t hva = (uintptr_t)mmap(NULL, PAGE_SIZE, PROT_READ|PROT_WRITE, MAP_ANON|MAP_PRIVATE, -1, 0);
	gpaddr_t gpa = 0x3000;
	nvmm_hva_map(&mach, hva, PAGE_SIZE);
	nvmm_gpa_map(&mach, hva, gpa, PAGE_SIZE, PROT_READ|PROT_WRITE);
Here we allocate a simple HVA in our application via mmap. Then, we turn this
HVA into a special buffer that NVMM will be able to use. Finally, we tell
the host to link the GPA (0x3000) towards the HVA. From then on, the guest
is allowed to touch what it perceives as being a simple physical page
located at address 0x3000, and our application can directly modify the
content of this page by reading and writing into the address pointed to by
‘hva’.
Running the VM
The final step is running the VM for real. This is achieved with a VCPU Loop,
which runs our VCPU0 and processes the different exit reasons, typically
in the following form:
	struct nvmm_exit exit;
	while (1) {
		nvmm_vcpu_run(&mach, 0, &exit);
		switch (exit.reason) {
		case NVMM_EXIT_NONE:
			break; /* nothing to do */
		case ... /* completed as needed */
		}
	}
The nvmm_vcpu_run function blocks, and runs the VM until an exit or a
rescheduling occurs.
Full Code
We’re done now: we know how to create a VM and give it VCPUs, we know how to modify
the registers of the VCPUs, we know how to allocate and modify guest memory, and we
know how to run a guest.
Let’s sum it all up in one concrete example: a calculator that runs inside a VM.
This simple application receives two 16bit ints as parameters, launches a VM that
performs the addition of these two ints, fetches the result, and displays it.
That’s about it, we have our first NVMM-based application in less than 100 lines
of C code, and it is an example of how NetBSD’s new virtualization API can be
used to easily implement VM-related services.
Libnvmm can go farther than just providing wrapper functions around IOCTLs.
Simply said, certain exit reasons are very complex to handle, and libnvmm
provides assists that can emulate certain guest operations on behalf
of the userland emulator.
Libnvmm embeds a comprehensive machinery, made of three main components:
-
The MMU Walker: the component in charge of performing a manual GVA→GPA
translation. It basically walks the MMU page tree of the guest; if the guest is
running in x86 64bit mode for example, it will walk the four layers of pages in
the guest to obtain a GPA. -
The Instruction decoder: fetches and disassembles the guest instructions that
cause MMIO exits. The disassembler uses a Finite State Machine. The result of the
disassembly is summed up in a structure that is passed to the instruction emulator,
possibly several times consecutively. -
The instruction emulator: as its name indicates, it emulates the execution of an
instruction. Contrary to many other disassemblers and hypervisors, NVMM makes a
clear distinction between the decoder and the emulator.
An NVMM-based application can therefore avoid the burden of implementing these
components, by just leveraging the assists provided in libnvmm.
NVMM can be used in security products, such as sandboxing systems, to provide
contained environments. Without elaborating more on my warplans, this is a
project I’ve been thinking about for some time on NetBSD.
One thing you may have noticed from Fig. A, is that the complex emulation
machinery is not in the kernel, but in userland. This is an excellent
security property of NVMM, because it reduces the risk for the host in case of
bug or vulnerability – the host kernel remains unaffected –, and also has the
advantage of making the machinery easily fuzzable. Currently, this property is
not found in other hypervisors such as KVM, HAXM or Bhyve, and I hope we’ll be
able to preserve it as we move forward with more backends.
Another security property of NVMM is that the assists provided by libnvmm are
invoked only if the emulator explicitly called them. In other words, the complex
machinery is not launched automatically, and an emulator is free not to use it
if it doesn’t want to. This can limit the attack surface of applications that
create limited VMs, and want to keep things simple and under control as much as
possible.
Finally, NVMM naturally benefits from the modern bug detection features available
in NetBSD (KASAN, KUBSAN, and more), and from NetBSD’s automated test framework.
Contrary to other pseudo-cross-platform kernel drivers such as VirtualBox or
HAXM, NVMM is well integrated into the NetBSD kernel, and this allows us to
optimize the context switches between the guests and the host, in order to avoid
expensive operations in certain cases.
Another performance aspect of NVMM is the fact that in order to implement the
secondary MMU, NVMM uses NetBSD’s pmap subsystem. This allows us to have
pageable guest pages, that the host can allocate on-demand to limit memory
consumption, and can then swap out when it comes under memory pressure.
It also goes without saying that NVMM is fully MP-safe, and uses fine-grained
locking to be able to run many VMs and many VCPUs simultaneously.
On the userland side, libnvmm tries to minimize the processing cost, by for
example doing only a partial emulation of certain instructions, or by batching
together certain guest IO operations. A lot of work has been done to try to
reduce the number of syscalls an emulator would have to make, in order to
increase the overall performance on the userland side; but there are several
cases where it is not easy to keep a clean design.
As of this writing, NVMM supports two backends, x86-SVM for AMD CPUs and
x86-VMX for Intel CPUs. In each case, NVMM can support up to 128 virtual
machines, each having a maximum of 256 VCPUs and 128GB of RAM.
Armed with our full virtualization stack, our flexible backends, our user-friendly
virtualization API, our comprehensive assists, and our swag NVMM logo, we can now
add NVMM support in whatever existing emulator we want.
That’s what was done in Qemu, with
this patch,
which shall soon be upstreamed. It uses libnvmm to provide hardware-accelerated
virtualization on NetBSD.
It is now fully functional, and can run a wide variety of operating systems, such
as NetBSD (of course), FreeBSD, OpenBSD, Linux, Windows XP/7/8.1/10,
among others. All of that works equally across the currently supported NVMM
backends, which means that Qemu+NVMM can be used on both AMD and Intel CPUs.
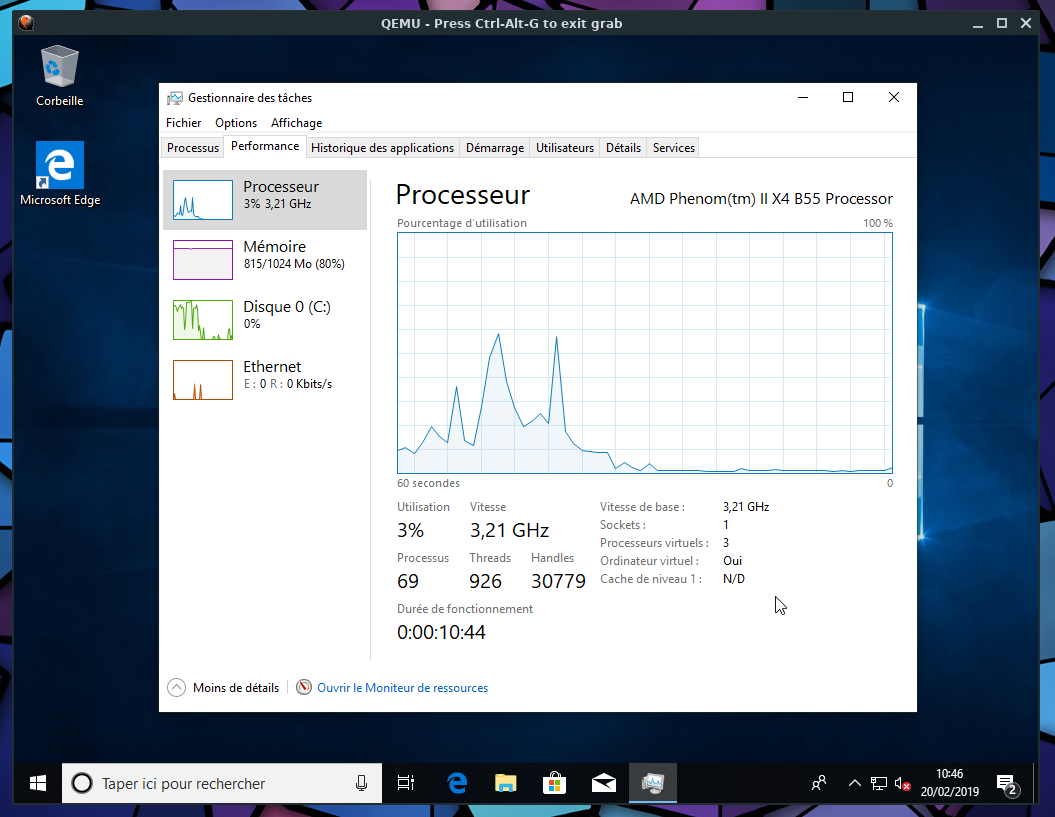
Fig. C: Example, Windows 10 running on Qemu+NVMM, with 3 VCPUs,
on a host that has a quad-core AMD CPU.
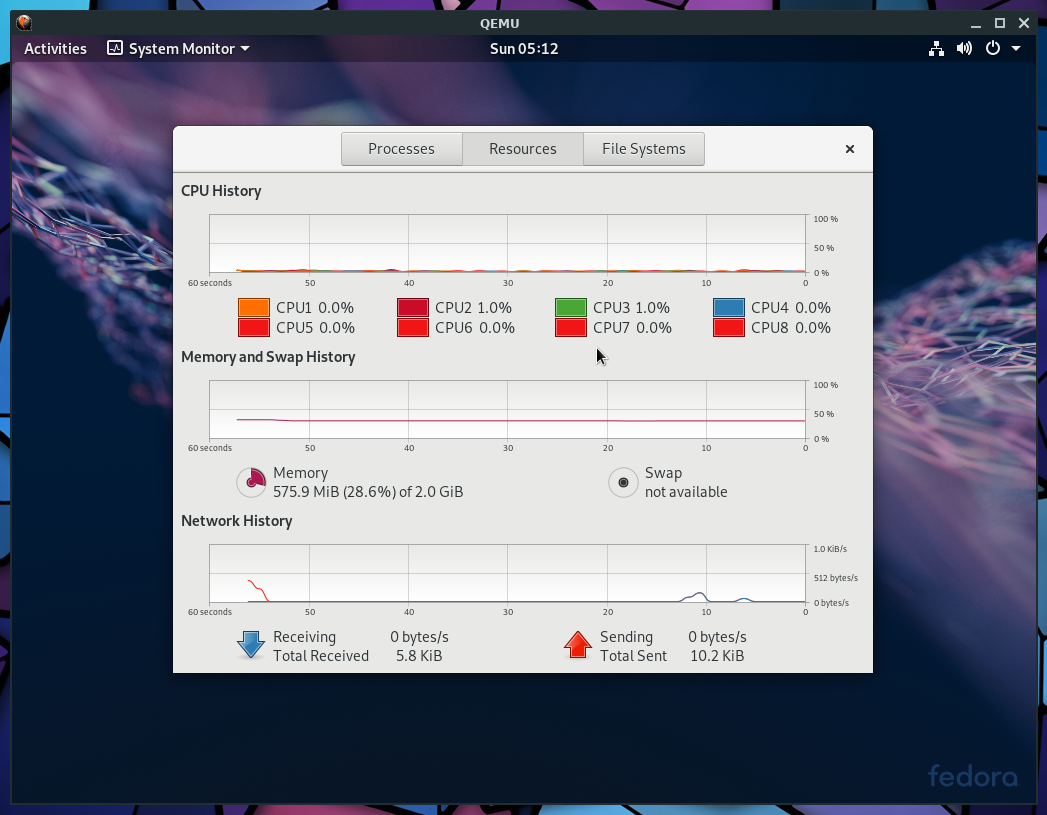
Fig. D: Example, Fedora 29 running on Qemu+NVMM, with 8 VCPUs,
on a host that has a quad-core Intel CPU.
The instructions on how to use Qemu+NVMM are available on
this page.
All of NVMM is available in NetBSD-current, and will be part of the NetBSD 9
release.
Even if perfectly functional, the Intel backend of NVMM is younger than its AMD
counterpart, and it will probably receive some more performance and stability
improvements.
There still are, also, several design aspects that I haven’t yet settled,
because I haven’t yet decided the best way to fix them.
Overall, I expect new backends to be added for other architectures than x86, and
I also expect to add NVMM support in more emulators.
That’s all, ladies and gentlemen. In six months of spare time, we went from Zero
to NVMM, and now have a full virtualization stack that can run advanced operating
systems in a flexible, fast and secure fashion.
Not bad
[
2 comments]
